Introduction
In this post, How to implement Custom user defined At Least One required Validation rules in MVC 4 application.There are many validation attributes available in MVC 4 like required, StringLength, Range, RegularExpression and more but sometimes we may require specific type of validation .In this article, I will explain how you can create your own custom validation attribute for At Least One required Validation
Steps :
Step - 1 : Create New Project.
Go to File > New > Project > Select asp.net MVC4 web application > Entry Application Name > Click OK > Select Internet Application > Select view engine Razor > OKStep-2: Add a Database.
Go to Solution Explorer > Right Click on App_Data folder > Add > New item > Select SQL Server Database Under Data > Enter Database name > Add.Step-3: Create table for save data.
Open Database > Right Click on Table > Add New Table > Add Columns > Save > Enter table name > Ok.In this example, I have used one tables as below

Step-4: Add Entity Data Model.
Go to Solution Explorer > Right Click on Project name form Solution Explorer > Add > New item > Select ADO.net Entity Data Model under data > Enter model name > Add.A popup window will come (Entity Data Model Wizard) > Select Generate from database > Next >
Chose your data connection > select your database > next > Select tables > enter Model Namespace > Finish.
Step-5: Add a new class for create custom validation rule.
write the following code in this class.We need to import following namespace
            using System.ComponentModel.DataAnnotations;
            using System.Web.Mvc;
using System;
using System.Collections.Generic;
using System.ComponentModel.DataAnnotations;
using System.Linq;
using System.Web;
using System.Web.Mvc;

namespace MVCCustomValidation
{
    public class AtLeastOneRequired : ValidationAttribute, IClientValidatable
    {
        public string OtherPropertyNames;

        /// <summary>
        ///
        /// </summary>
        /// <param name="otherPropertyNames">Multiple property name with comma(,) separator</param>
        public AtLeastOneRequired(string otherPropertyNames)
        {
            OtherPropertyNames = otherPropertyNames;
        }

        protected override ValidationResult IsValid(object value, ValidationContext validationContext)
        {
            string[] propertyNames = OtherPropertyNames.Split(',');
            bool isAllNull = true;
            foreach (var i in propertyNames)
            {
                var p = validationContext.ObjectType.GetProperty(i);
                var val = p.GetValue(validationContext.ObjectInstance, null);
                if (val != null && val.ToString().Trim()!="")
                {
                    isAllNull = false;
                    break;
                }
            }

            if (isAllNull)
            {
                return new ValidationResult(FormatErrorMessage(validationContext.DisplayName));
            }
            else
            {
                return null;
            }
        }

        public IEnumerable<ModelClientValidationRule> GetClientValidationRules(ModelMetadata metadata, ControllerContext context)
        {
            var rules = new ModelClientValidationRule()
            {
                 ErrorMessage = FormatErrorMessage(metadata.DisplayName),
                  ValidationType = "atleastonerequired" // validation type should be lowercase
            };
            rules.ValidationParameters["otherpropertynames"] = OtherPropertyNames;
            yield return rules;
        }
    }
}
Step-6: Add a new js file for apply custom validation rule client side.
Go to Solution Explorer > Right Click on Controllers folder form Solution Explorer > Add > new item > select javascript file > Enter file name > Add.write the following code in this js file.
// Here I will add code for client side validation for our custom validation (At Least One required Validation)

$.validator.unobtrusive.adapters.addSingleVal("atleastonerequired", "otherpropertynames");
$.validator.addMethod("atleastonerequired", function (value, element, params) {
    var param = params.toString().split(',');
    var isAllNull = true;
    $.each(param, function (i, val) {
        var valueOfItem = $('#' + val).val().trim();
        if (valueOfItem != '') {
            isAllNull = false;
            return false;
        }
    });
    if (isAllNull) {
        return false;
    }
    else {
        return true;
    }
});
Step-7: Apply validation on model.
Open your model and add validation. Please follow below codenamespace MVCCustomValidation
{
using System;
using System.Collections.Generic;
using System.ComponentModel.DataAnnotations;
public partial class Registration
{
public int ID { get; set; }
[Required(ErrorMessage= "Full Name Required!", AllowEmptyStrings=false)]
public string FullName { get; set; }
[Required(ErrorMessage = "Username Required!", AllowEmptyStrings = false)]
public string Username { get; set; }
[Required(ErrorMessage = "Password Required!", AllowEmptyStrings = false)]
[DataType(DataType.Password)]
public string Password { get; set; }
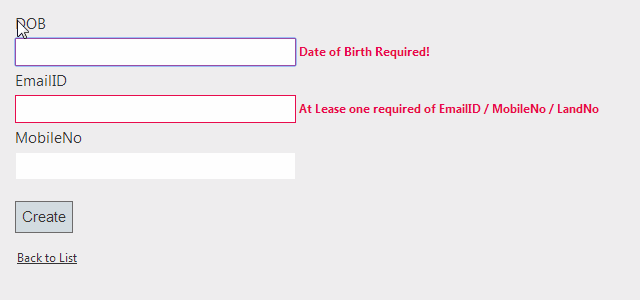
[Required(ErrorMessage = "Date of Birth Required!", AllowEmptyStrings = false)]
[DataType(DataType.DateTime)]
public System.DateTime DOB { get; set; }
[AtLeastOneRequired("EmailID,MobileNo,LandNo", ErrorMessage = "At Lease one required of EmailID / MobileNo / LandNo")]
public string EmailID { get; set; }
public string MobileNo { get; set; }
public string LandNo { get; set; }
}
}
Step-8: Add a new Controller .
Go to Solution Explorer > Right Click on Controllers folder form Solution Explorer > Add > Controller > Enter Controller name > Select Templete "empty MVC Controller"> Add.Step-9: Add new action into your controller for Get Method
Here I have added "form" Action into "Registration" Controller. Please write this following code public class RegistrationController : Controller
{
public ActionResult form()
{
return View();
}
}
Step-10: Add view for this Action & design.
Right Click on Action Method (here right click on form action) > Add View... > Enter View Name > Select View Engine (Razor) > Check "Create a strong-typed view" > Select your model class > Add.HTML Code
            @model MVCCustomValidation.Registration

@{
    ViewBag.Title = "form";
}

<h2>form</h2>

@using (Html.BeginForm()) {
    @Html.ValidationSummary(true)
    if (ViewBag.Message != null)
    {
        <div style="width:300px; color:red; padding:5px; border:1px solid green">
            @ViewBag.Message
        </div>
    }
    <fieldset>
        <legend>Registration</legend>

        <div class="editor-label">
            @Html.LabelFor(model => model.FullName)
        </div>
        <div class="editor-field">
            @Html.EditorFor(model => model.FullName)
            @Html.ValidationMessageFor(model => model.FullName)
        </div>

        <div class="editor-label">
            @Html.LabelFor(model => model.Username)
        </div>
        <div class="editor-field">
            @Html.EditorFor(model => model.Username)
            @Html.ValidationMessageFor(model => model.Username)
        </div>

        <div class="editor-label">
            @Html.LabelFor(model => model.Password)
        </div>
        <div class="editor-field">
            @Html.EditorFor(model => model.Password)
            @Html.ValidationMessageFor(model => model.Password)
        </div>

        <div class="editor-label">
            @Html.LabelFor(model => model.DOB)
        </div>
        <div class="editor-field">
            @Html.EditorFor(model => model.DOB)
            @Html.ValidationMessageFor(model => model.DOB)
        </div>

        <div class="editor-label">
            @Html.LabelFor(model => model.EmailID)
        </div>
        <div class="editor-field">
            @Html.EditorFor(model => model.EmailID)
            @Html.ValidationMessageFor(model => model.EmailID)
        </div>

        <div class="editor-label">
            @Html.LabelFor(model => model.MobileNo)
        </div>
        <div class="editor-field">
            @Html.EditorFor(model => model.MobileNo)
            @Html.ValidationMessageFor(model => model.MobileNo)
        </div>

        <div class="editor-label">
            @Html.LabelFor(model => model.LandNo)
        </div>
        <div class="editor-field">
            @Html.EditorFor(model => model.LandNo)
            @Html.ValidationMessageFor(model => model.LandNo)
        </div>

        <p>
            <input type="submit" value="Create" />
        </p>
    </fieldset>
}

<div>
    @Html.ActionLink("Back to List", "Index")
</div>

@section Scripts {
    @Scripts.Render("~/bundles/jqueryval")

    @* I will add our custom js here  *@
    <script src="~/Scripts/MyCustomValidation.js"></script>
}
Step-11: Add new action into your controller for POST Method (for form)
Here I have added "form" Action with Model Parameter (here "Registration") into "Registration" Controller. Please write this following code [HttpPost]
public ActionResult form(Registration r)
{
if (ModelState.IsValid)
{
// here MyDatabaseEntities is our datacontext
using (MyDatabaseEntities dc = new MyDatabaseEntities())
{
dc.Registrations.Add(r);
dc.SaveChanges();
ModelState.Clear();
r = null;
ViewBag.Message = "Success!";
}
}
else
{
ViewBag.Message = "Failed!";
}
return View(r);
}

