Introduction
In the previous part of the tutorial, we have seen how to implement basic in-place editing in asp.net MVC webgrid, where we have implemented in-place editing with simple textbox only. Now in this part, we will see how to implement Advance In-place editing in asp.net MVC webgrid where we will learn to use some advanced control like select/dropdown list and DateTime picker.
Before reading this article, I would recommend reading my previous tutorial where I have explained how to implement basic In-place editing in asp.net MVC webgrid for better understanding.
Here in this part 2 application, First we will learn to implement in-place editing with dropdown list control and then we will see how we can use DateTime picker for in-place editing.Before reading this article, I would recommend reading my previous tutorial where I have explained how to implement basic In-place editing in asp.net MVC webgrid for better understanding.
Let's start implementing advance In-place editing in asp.net MVC webgrid.
Here In this article, I have used Visual Studio 2017
Line 60:
Line 61:
Line 62:
Line 63:
and all remaining parameters we had already used and described in the part 1 tutorial.
Step - 1: Open Part 1 - Basic In-place editing in asp.net MVC webgrid application in visual studio.
We will start with the application what we have done till now in Part 1 of this tutorial.
So I am going to open the part 1 application first and if you have not downloaded the source code of the part 1 application till now, you can download from the below link.
Download Part 1 - Basic In-place editing in asp.net MVC webgrid source code.
So I am going to open the part 1 application first and if you have not downloaded the source code of the part 1 application till now, you can download from the below link.
Download Part 1 - Basic In-place editing in asp.net MVC webgrid source code.
Step-2: Update Index.cshtml for make Role columns cell editable.
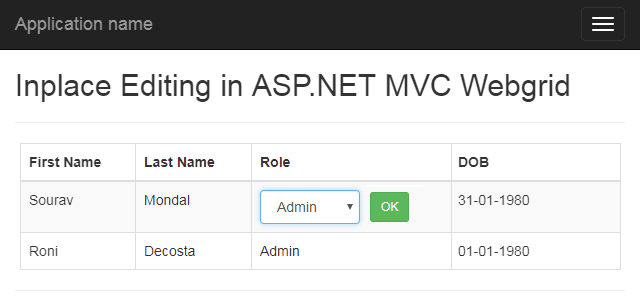
If I run the application we have done till now in part 1, you can see we have done in place editing in the First Name and Last Name columns cells. Now we will make the Role column cells editable with dropdown list control as we have a list of user roles available in our database.
Go to Solution Explorer > Open Index.cshtml view page from View > Home folder. Update the view page adding below yellow make jquery code for making the Role column cells editable.
Go to Solution Explorer > Open Index.cshtml view page from View > Home folder. Update the view page adding below yellow make jquery code for making the Role column cells editable.
@model List<InlineEditingWebgrid.ViewModel.SiteUserModel>
@{
    ViewBag.Title = "Index";
    WebGrid grid = new WebGrid(Model, rowsPerPage:10);
}
<h2>Inplace editing in webgrid</h2>
<hr />
<div class="row">
    @grid.GetHtml(
        tableStyle:"table table-responsive table-striped table-bordered",
        columns: grid.Columns(
            grid.Column(header:"First Name", format:@<text><div class="edit" data-id="@item.ID" data-propertyname="FirstName">@item.FirstName</div></text>),
            grid.Column(header: "Last Name", format:@<text><div class="edit" data-id="@item.ID" data-propertyname="LastName">@item.LastName</div></text>),
            grid.Column(header: "Role", format:@<text><div class="editSelect" data-id="@item.ID" data-propertyname="RoleID">@item.RoleName</div></text>),
            grid.Column(header: "DOB", format:@<text><div class="editDate" data-id="@item.ID" data-propertyname="DOB">@string.Format("{0:dd-MM-yyyy}", item.DOB )</div></text>)
        )
    )
</div>
<style>
    .table td{width:25%;}
    .w100 { width:100px;}
    .margin10{ margin-left:10px; }
</style>

@section scripts{
    <script src="https://www.appelsiini.net/download/jquery.jeditable.js"></script>
    <script>
        $(document).ready(function () {
            var oldValue = '';
            $('.edit').editable('/home/saveuser', {
                cssclass: 'jeditForm',
                tooltip: 'click to edit me...',
                width: 'none',
                height: 'none',
                onsubmit: function (settings, original) {
                    oldValue = original.revert;
                },
                submitdata: function () {
                    return {
                        id: $(this).data('id'),
                        PropertyName: $(this).data('propertyname')
                    }
                },
                callback: function (value, settings) {
                    var jsonData = $.parseJSON(value);
                    if (jsonData.status) {
                        $(this).text(jsonData.value);
                    }
                    else {
                        $(this).text(oldValue);
                    }
                }
            })

            $('.editSelect').editable('/home/saveuser', {
                cssclass: 'jeditForm',
                tooltip: 'click to edit me...',
                width: 'none',
                height: 'none',
                type: 'select',
                submit: 'Ok',
                loadurl: '/home/GetUserRoles',
                loaddata: function () {
                    return {id: $(this).data('id')}
                },
                onsubmit: function (settings, original) {
                    oldValue = original.revert;
                },
                submitdata: function () {
                    return {
                        id: $(this).data('id'),
                        PropertyName: $(this).data('propertyname')
                    }
                },
                callback: function (value, settings) {
                    var jsonData = $.parseJSON(value);
                    if (jsonData.status) {
                        $(this).text(jsonData.value);
                    }
                    else {
                        $(this).text(oldValue);
                    }
                }
            })

            $('.editSelect').click(function () {
                $('select', this).addClass('form-control pull-left w100');
                $('button', this).addClass('btn btn-sm btn-success margin10')
            })
        })
    </script>
}
Line 60:
type: 'select' - This is for render select/dropdown list control in edit modeLine 61:
submit: 'Ok' - This is for rendering submit button. Here the edit form will submit only when the submitted button will be clicked. I have added this submit button here as I want the user to click on the submit button for submitting updated data to the server.Line 62:
loadurl: '/home/GetUserRoles' - The loadurl allows us to fetch select/dropdown list option from external URL like here we are fetching from '/home/GetUserRoles' URL.Line 63:
loaddata: function () {return {id: $(this).data('id')}} - The loaddata allows us to pass extra parameter when using loadurl. Here we are passing selected user id for getting the selected user role and select in the select/dropdown list control.and all remaining parameters we had already used and described in the part 1 tutorial.
Step-3: Add an another MVC action "GetUserRoles" in HomeController.
Now in this step, We will add an another MVC action "GetUserRoles" in the HomeController, where we will fetch user roles data from the database and generate response content allowed by the jeditable plugin for rendering select/dropdown list options.
public ActionResult GetUserRoles(int id)
{
    //Allowed response content format
    //{'E':'Letter E','F':'Letter F','G':'Letter G', 'selected':'F'}
    int selectedRoleID = 0;
    StringBuilder sb = new StringBuilder();
    using (MyDatabaseEntities dc = new MyDatabaseEntities())
    {
        var roles = dc.UserRoles.OrderBy(a => a.RoleName).ToList();
        foreach (var item in roles)
        {
            sb.Append(string.Format("'{0}':'{1}',", item.ID, item.RoleName));
        }

        selectedRoleID = dc.SiteUsers.Where(a => a.ID == id).First().RoleID;

    }

    sb.Append(string.Format("'selected': '{0}'", selectedRoleID));
    return Content("{" + sb.ToString() + "}");
}
Step-4: Update "saveuser " existing MVC action of HomeController.
Now we have to modify the saveuser action a little. as till now, we had written code for updating First name and Last name fields only where both fields were string type but now we have to write code for RoleID which is integer type. And also in the next step, we have to update DOB field also which is DateTime type.
Updated
and all remaining parameters we had already used and described in the part 1 tutorial.
Updated
saveuser MVC action[HttpPost]
public ActionResult saveuser(int id, string propertyName, string value)
{
var status = false;
var message = "";
//Update data to database
using (MyDatabaseEntities dc = new MyDatabaseEntities())
{
var user = dc.SiteUsers.Find(id);
object updateValue = value;
bool isValid = true;
if (propertyName == "RoleID")
{
int newRoleID = 0;
if (int.TryParse(value,out newRoleID))
{
updateValue = newRoleID;
//Update value field
value = dc.UserRoles.Where(a => a.ID == newRoleID).First().RoleName;
}
else
{
isValid = false;
}
}
else if (propertyName == "DOB")
{
DateTime dob;
if (DateTime.TryParseExact(value,"dd-MM-yyyy",new CultureInfo("en-US"), DateTimeStyles.None, out dob))
{
updateValue = dob;
}
else
{
isValid = false;
}
}
if (user != null && isValid)
{
dc.Entry(user).Property(propertyName).CurrentValue = updateValue;
dc.SaveChanges();
status = true;
}
else
{
message = "Error!";
}
}
var response = new { value = value, status = status, message = message };
JObject o = JObject.FromObject(response);
return Content(o.ToString());
}
Step-5: Update Index.cshtml for make DOB column cells editable.
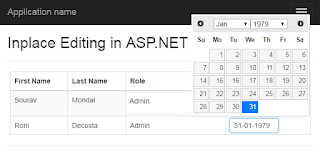
We have done making all the columns cells editable except DOB. So now we will make the DOB column cells editable.
But as you can see the DOB is DateTime field So we should have a datepicker plugin and the plugin should work with our jeditable plugin. Right?
We don't have to worry about this as there is jquery.jeditable.datepicker.js plugin available for the same.
Download jquery.jeditable.datepicker.js plugin and add the jquery.jeditable.datepicker.js javascript file in the application. I have added the javascript file in the Scripts folder of my application.
Go to Solution Explorer > Open Index.cshtml view page from View > Home folder. Update the view page adding below yellow make jquery code for making the Role column cells editable.
@model List<InlineEditingWebgrid.ViewModel.SiteUserModel>
@{
    ViewBag.Title = "Index";
    WebGrid grid = new WebGrid(Model, rowsPerPage:10);
}
<h2>Inplace editing in webgrid</h2>
<hr />
<div class="row">
    @grid.GetHtml(
        tableStyle:"table table-responsive table-striped table-bordered",
        columns: grid.Columns(
            grid.Column(header:"First Name", format:@<text><div class="edit" data-id="@item.ID" data-propertyname="FirstName">@item.FirstName</div></text>),
            grid.Column(header: "Last Name", format:@<text><div class="edit" data-id="@item.ID" data-propertyname="LastName">@item.LastName</div></text>),
            grid.Column(header: "Role", format:@<text><div class="editSelect" data-id="@item.ID" data-propertyname="RoleID">@item.RoleName</div></text>),
            grid.Column(header: "DOB", format:@<text><div class="editDate" data-id="@item.ID" data-propertyname="DOB">@string.Format("{0:dd-MM-yyyy}", item.DOB )</div></text>)
        )
    )
</div>
<style>
    .table td{width:25%;}
    .w100 { width:100px;}
    .margin10{ margin-left:10px; }
</style>

<link href="https://cdnjs.cloudflare.com/ajax/libs/jqueryui/1.12.1/jquery-ui.min.css" rel="stylesheet" />
@section scripts{

    <script src="https://cdnjs.cloudflare.com/ajax/libs/jqueryui/1.12.1/jquery-ui.min.js"></script>

    <script src="https://www.appelsiini.net/download/jquery.jeditable.js"></script>
    <script src="~/Scripts/jquery.jeditable.datepicker.js"></script>
    <script>
        $(document).ready(function () {
            var oldValue = '';
            $('.edit').editable('/home/saveuser', {
                cssclass: 'jeditForm',
                tooltip: 'click to edit me...',
                width: 'none',
                height: 'none',
                onsubmit: function (settings, original) {
                    oldValue = original.revert;
                },
                submitdata: function () {
                    return {
                        id: $(this).data('id'),
                        PropertyName: $(this).data('propertyname')
                    }
                },
                callback: function (value, settings) {
                    var jsonData = $.parseJSON(value);
                    if (jsonData.status) {
                        $(this).text(jsonData.value);
                    }
                    else {
                        $(this).text(oldValue);
                    }
                }
            })

            $('.editSelect').editable('/home/saveuser', {
                cssclass: 'jeditForm',
                tooltip: 'click to edit me...',
                width: 'none',
                height: 'none',
                type: 'select',
                submit: 'Ok',
                loadurl: '/home/GetUserRoles',
                loaddata: function () {
                    return {id: $(this).data('id')}
                },
                onsubmit: function (settings, original) {
                    oldValue = original.revert;
                },
                submitdata: function () {
                    return {
                        id: $(this).data('id'),
                        PropertyName: $(this).data('propertyname')
                    }
                },
                callback: function (value, settings) {
                    var jsonData = $.parseJSON(value);
                    if (jsonData.status) {
                        $(this).text(jsonData.value);
                    }
                    else {
                        $(this).text(oldValue);
                    }
                }
            })

            $('.editSelect').click(function () {
                $('select', this).addClass('form-control pull-left w100');
                $('button', this).addClass('btn btn-sm btn-success margin10')
            })

            $('.editDate').editable('/home/saveuser', {
                cssclass: 'jeditForm',
                tooltip: 'click to edit me...',
                type: 'datepicker',
                datepicker: {
                    dateFormat: 'dd-mm-yy',
                    changeMonth: true,
                    changeYear: true,
                    yearRange: '1900:' +(new Date().getFullYear()  - 18)
                },
                onsubmit: function (settings, original) {
                    oldValue = original.revert;
                },
                submitdata: function () {
                    return {
                        id: $(this).data('id'),
                        PropertyName: $(this).data('propertyname')
                    }
                },
                callback: function (value, settings) {
                    var jsonData = $.parseJSON(value);
                    if (jsonData.status) {
                        $(this).text(jsonData.value);
                    }
                    else {
                        $(this).text(oldValue);
                    }
                }
            })
        })
    </script>
}
Line 99:
Line 100:
type: 'datepicker' - This is for render datepicker control in edit modeLine 100:
datepicker: '...' - In the datepicker, we can define datepicker options. and all remaining parameters we had already used and described in the part 1 tutorial.
