Introduction
In one of the previous article we have Implemented custom Forms Authentication in ASP.NET MVC application, but there was a risk for password-guessing attack also known as brute force attack.Here In this article, I am going to show you how to build an ASP.NET MVC web app with Two-Factor Authentication using Google Authenticator for preventing brute force attack.
Two-Factor authentication is a great way to help secure user accounts as It authenticates users using two valid authentication factors.
Here in this article, we will first verify user from our database and then will provide an option to the user for verifying using real-time token (generated via Google Authenticator) (not SMS as it's costly). As I have said, We will use Google Authenticator(it's completely free of cost) So, The Google Authenticator software must be installed on the user's smartphone.
The workflow :

Just follow the following steps in order to implement "Two-Factor Authentication using Google Authenticator in asp.net MVC".
Here In this article, I have used Visual Studio 2013
Step - 1: Create New Project.
Go to File > New > Project > ASP.NET Web Application (under web) > Entry Application Name > Click OK > Select Empty template > Checked MVC (under "Add folders and core references for" option) > OK
Step-2: Add reference of Google.Authenticator from NuGet
Go to Solution Explorer > Right Click on References form Solution Explorer > Manage NuGetPackages... > Search for "Google.Authenticator"> Install > Close.
I have added a folder named "ViewModel" first
Go to Solution Explorer > Right Click on Project Name > Add > New Folder > Rename.
and then added a class "LoginModel.cs" .
Go to Solution Explorer > Right Click on the folder ("ViewModel")> Add > New Item... > Select class under code > Enter class name > Add.
Here I have created a controller named "HomeController"
HTML Code

Step-3: Add a new ViewModel (class).
Here I have added a new class "LoginModel.cs" in our application.I have added a folder named "ViewModel" first
Go to Solution Explorer > Right Click on Project Name > Add > New Folder > Rename.
and then added a class "LoginModel.cs" .
Go to Solution Explorer > Right Click on the folder ("ViewModel")> Add > New Item... > Select class under code > Enter class name > Add.
public class LoginModel
{
    public string Username { get; set; }
    public string Password { get; set; }
}
Step-4: Create an MVC Controller.
Go to Solution Explorer > Right Click on Controllers folder form Solution Explorer > Add > Controller > Enter Controller name > Select Templete "empty MVC Controller"> Add.Here I have created a controller named "HomeController"
Step-5: Add a new action for login to your controller.
Here I have added "Login" Action to "Home" Controller. Please write this following codeprivate const string key = "qaz123!@@)(*"; // any 10-12 char string for use as private key in google authenticator
public ActionResult Login()
{
return View();
}
You can see here, I have declared a private variable "key", which we will use later for generate Google authenticator code.
HomeController.cs
using _2FAGoogleAuthenticator.ViewModel;
using Google.Authenticator;
using System.Web.Mvc;
namespace _2FAGoogleAuthenticator.Controllers
{
public class HomeController : Controller
{
private const string key = "qaz123!@@)(*"; // any 10-12 char string for use as private key in google authenticator
public ActionResult Login()
{
   return View();
}
}
}
Step-6: Add view for that login action and design.
Right Click on Action Method (here right click on Index action) > Add View... > Enter View Name > Select "Empty" under Template dropdown > Select the "LoginModel" (created at previous step) under Model class dropdown > Add.HTML Code
@model _2FAGoogleAuthenticator.ViewModel.LoginModel
@{
    ViewBag.Title = "Login";
}
<h2>Login</h2>
@* Here we will add 2 form, 1 for Login and another one for 2FA token verification form *@
@if (ViewBag.Status == null || !ViewBag.Status)
{
    <!--Show login form here, Viewbag.Status is used for check is already veirfied from our database or not-->
    <div>@ViewBag.Message</div>
    <div>
        @using (Html.BeginForm())
        {
            <div class="form-group">
                <label for="Username">Username : </label>
                @Html.TextBoxFor(a => a.Username, new { @class = "form-control"})
            </div>
            <div class="form-group">
                <label for="Password">Password : </label>
                @Html.TextBoxFor(a => a.Password, new { @class="form-control", type="password"})
            </div>
            <input type="submit" value="Login" class="btn btn-default" />
        }
    </div>
}
else
{
    <!--Show 2FA verification form here-->
    <div>@ViewBag.Message</div>
    <div>
        <img src="@ViewBag.BarcodeImageUrl"/>
    </div>
    <div>
        Manual Setup Code : @ViewBag.SetupCode
    </div>
    <div>
        @using (Html.BeginForm("Verify2FA","Home", FormMethod.Post))
        {
            <input type="text" name="passcode" />
            <input type="submit" class="btn btn-success" />
        }
    </div>
}
Step-7: Add an another action (POST method) for verify user credential from database.
Here in this action, we will first verify user provided credential from our database and then if the user is valid, we will generate 2-factor authentication setup code (barcode and manual entry key) for use in Google Authenticator mobile app for setup account.
[HttpPost]
public ActionResult Login(LoginModel login)
{
    string message = "";
    bool status = false;

    //check username and password form our database here
    //for demo I am going to use Admin as Username and Password1 as Password static value
    if (login.Username == "Admin" && login.Password == "Password1")
    {
        status = true; // show 2FA form
        message = "2FA Verification";
        Session["Username"] = login.Username;

        //2FA Setup
        TwoFactorAuthenticator tfa = new TwoFactorAuthenticator();
        string UserUniqueKey = (login.Username + key); //as Its a demo, I have done this way. But you should use any encrypted value here which will be unique value per user.
        Session["UserUniqueKey"] = UserUniqueKey;
        var setupInfo = tfa.GenerateSetupCode("Dotnet Awesome", login.Username, UserUniqueKey, 300, 300);
        ViewBag.BarcodeImageUrl = setupInfo.QrCodeSetupImageUrl;
        ViewBag.SetupCode = setupInfo.ManualEntryKey;
    }
    else
    {
        message = "Invalid credential";
    }
    ViewBag.Message = message;
    ViewBag.Status = status;
    return View();
}
Step-8: Add an another action for authorized users (here "MyProfile"), where authorized user will be redirected to after successful login.
public ActionResult MyProfile()
{
    if (Session["Username"] == null || Session["IsValid2FA"] == null || !(bool)Session["IsValid2FA"])
    {
        return RedirectToAction("Login");
    }

    ViewBag.Message = "Welcome " + Session["Username"].ToString();
    return View();
}
Step-9: Add view for the action (here view for "MyProfile" action).
@{
    ViewBag.Title = "MyProfile";
}

<h2>My Profile</h2>
<h5>@ViewBag.Message</h5>
Step-10: Add an action for verifying 2 factory authentication token.
Here we will verify the authentication token generated by Google Authenticator mobile application and then the user will be redirected to the authorized area of the application (here in "My Profile" page).
public ActionResult Verify2FA()
{
    var token = Request["passcode"];
    TwoFactorAuthenticator tfa = new TwoFactorAuthenticator();
    string UserUniqueKey = Session["UserUniqueKey"].toString();
    bool isValid = tfa.ValidateTwoFactorPIN(UserUniqueKey, token);
    if (isValid)
    {
        Session["IsValid2FA"] = true;
        return RedirectToAction("MyProfile", "Home");
    }
    return RedirectToAction("Login", "Home");
}
Step-11: Set Login page as a default start up page.
Go to App_Start from solution explorer > RouteConfig.cs > Edit MapRoute > set "Login" action as default action instead of "Index" action.
Step-12: Run Application.
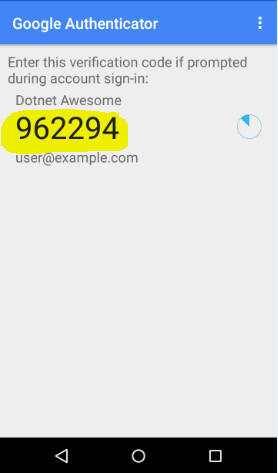
After provide valid username and password, you will be asked for provide 6 digit code (google authenticator code).
You can install Google Authenticator mobile app from here for android mobile and for windows phone, go to this link.
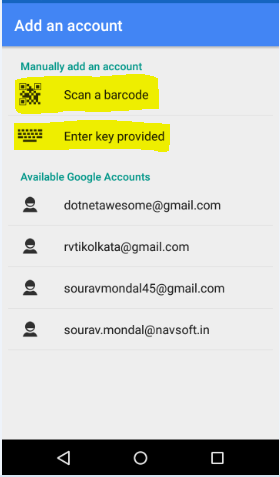
Open your Google Authenticator mobile app > Go to option > setup account > Scan a barcode / Enter key provided > Scan the barcode (from webpage) / manually enter manual setup code (from webpage) then you will get 6 digit code on your mobile app > enter this 6 digit code in the textbox (login page of web application) > and click on verify button.
You can install Google Authenticator mobile app from here for android mobile and for windows phone, go to this link.
Open your Google Authenticator mobile app > Go to option > setup account > Scan a barcode / Enter key provided > Scan the barcode (from webpage) / manually enter manual setup code (from webpage) then you will get 6 digit code on your mobile app > enter this 6 digit code in the textbox (login page of web application) > and click on verify button.
