Introduction
In this post, I am explain how to upload image to database and show in a Page without image handler in MVC4.Here I have upload image to the database and show in a view page without image handler in asp.net MVC4 application. for upload image I have used HttpPostedFileBase class. and show image from database I have converted byte image data to ToBase64String . Its very simple way to show image in the page from database.
Steps :
Step - 1 : Create New Project.
Go to File > New > Project > Select asp.net MVC4 web application > Entry Application Name > Click OK > Select Internet Application > Select view engine Razor > OKStep-2: Add a Database.
Go to Solution Explorer > Right Click on App_Data folder > Add > New item > Select SQL Server Database Under Data > Enter Database name > Add.Step-3: Create table for fetch data.
Open Database > Right Click on Table > Add New Table > Add Columns > Save > Enter table name > Ok.
In this example, I have used one tables as below

Step-4: Add Entity Data Model.
Go to Solution Explorer > Right Click on Project name form Solution Explorer > Add > New item > Select ADO.net Entity Data Model under data > Enter model name > Add.A popup window will come (Entity Data Model Wizard) > Select Generate from database > Next >
Chose your data connection > select your database > next > Select tables > enter Model Namespace > Finish.
Step-5: Make changes on model for enable file upload.
Open your model and do change as below. Here I have added one new Public property of type HttpPostedFileBase. Please follow below code using System.ComponentModel.DataAnnotations;
using System.Web;
public partial class ImageGallery
{
public int ImageID { get; set; }
public int ImageSize { get; set; }
public string FileName { get; set; }
public byte[] ImageData { get; set; }
[Required(ErrorMessage = "Please select file")]
public HttpPostedFileBase File { get; set; }
}
Step-6: Create a Controller .
Go to Solution Explorer > Right Click on Controllers folder form Solution Explorer > Add > Controller > Enter Controller name > Select Templete "empty MVC Controller"> Add.Step-7: Add new action into your controller for fetch images from database and show in view.
Here I have added "Gallery" Action into "ImageGallery" Controller. Please write this following code public class ImageGalleryController : Controller
{
public ActionResult Gallery()
{
List<ImageGallery> all = new List<ImageGallery>();
// Here MyDatabaseEntities is our datacontext
using (MyDatabaseEntities dc = new MyDatabaseEntities())
{
all = dc.ImageGalleries.ToList();
}
return View(all);
}
}
Step-8: Add view for Gallery Action & design for Show Images from database.
[N:B: Before going to add view, please rebuild solution.]Right Click on Action Method (here right click on Gallery action) > Add View... > Enter View Name > Select View Engine (Razor) > Check "Create a strong-typed view" > Select your model class > Select scaffold templete "List" > Add.
HTML Code
            @model List<MVCImageGallery.ImageGallery>
            @{
                ViewBag.Title = "Gallery";
            }
            <h2>Gallery</h2>
            <p>
                @Html.ActionLink("Upload New", "Upload")
            </p>
            @* Here I will show Uploaded Images *@
            <table>
                @{
                    int j = 0;
                    for (int i = 0; i < Model.Count(); i+=4)
                    {
                        j = i;
                        <tr>
                            @* I have done this for show 4 images in  a Row *@
                            @while (j < i+4 && j < Model.Count())
                         {
                                <td>
                                    <img src="data:image/png;base64,@Convert.ToBase64String(Model[j].ImageData,0,Model[j].ImageData.Length)" width="100" />
                                </td>
                                j++;
                         }
                        </tr>
                    }
                }
            </table>
Step-9: Add another new action into your controller for Get Method for upload image to the database
Here I have added "Upload" Action into "ImageGalleryController" Controller. Please write this following code public ActionResult Upload()
{
return View();
}
Step-10: Add view for action "Upload" for upload image.
Right Click on Action Method (here right click on Upload action) > Add View... > Enter View Name > Select View Engine (Razor) > Check "Create a strong-typed view" > Select your model class > Select scaffold templete "Create" > Add.
            @model MVCImageGallery.ImageGallery
            @{
                ViewBag.Title = "Upload";
            }
            <h2>Upload</h2>
            @using (Html.BeginForm("Upload","ImageGallery", FormMethod.Post,new{enctype="multipart/form-data"}))
            {
                @Html.ValidationSummary(true)
                <table>
                    <tr>
                        <td>Select File : </td>
                        <td>
                            @Html.TextBoxFor(Model=> Model.File, new{type="file"})
                            @Html.ValidationMessage("CustomError")
                        </td>
                        <td>
                            <input type="submit" value="Upload" />
                        </td>
                    </tr>
                </table>
            }

            @section Scripts {
                @Scripts.Render("~/bundles/jqueryval")
            }
Step-11: Add new action into "ImageGallery" controller for POST Method for upload image to the database.
Here I have added "Upload" Action with Model Parameter (here "ImageGallery") into "ImageGallery" Controller. Please write this following code [HttpPost]
public ActionResult Upload(ImageGallery IG)
{
// Apply Validation Here
if (IG.File.ContentLength > (2*1024*1024))
{
ModelState.AddModelError("CustomError", "File size must be less than 2 MB");
return View();
}
if (!(IG.File.ContentType == "image/jpeg" || IG.File.ContentType == "image/gif"))
{
ModelState.AddModelError("CustomError", "File type allowed : jpeg and gif");
return View();
}
IG.FileName = IG.File.FileName;
IG.ImageSize = IG.File.ContentLength;
byte[] data = new byte[IG.File.ContentLength];
IG.File.InputStream.Read(data, 0, IG.File.ContentLength);
IG.ImageData = data;
using (MyDatabaseEntities dc = new MyDatabaseEntities())
{
dc.ImageGalleries.Add(IG);
dc.SaveChanges();
}
return RedirectToAction("Gallery");
}
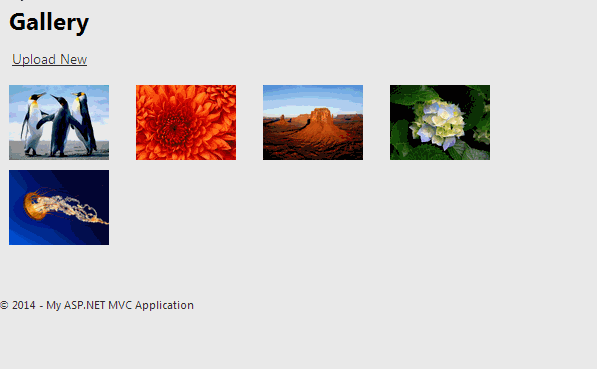
Step-12: Run Application.
Related Post :
- How to create career page with Upload file (CV) in MVC4.
- How to create a User Registration page using asp.net mvc 4
- How to create a login page using asp.net mvc 4
- How to upload image and generate thumbnails dynamically from an original big image.
- How to insert image into database and display in Gidview without Image Handler.
- How to add Watermark Text to an image dynamically while uploading in ASP.NET.
